A collection is the storage space in the Akselos Portal that holds all the data of one structural twin model. A new collection is created from the Contents page of an organization with two inputs, a name and a physics type, and the Create button. Once the collection exists, its Jobs page records every training, solving and post-processing job run in it, and Akselos Modeler can import the collection to a local computer, where the model is built, solved and customized.
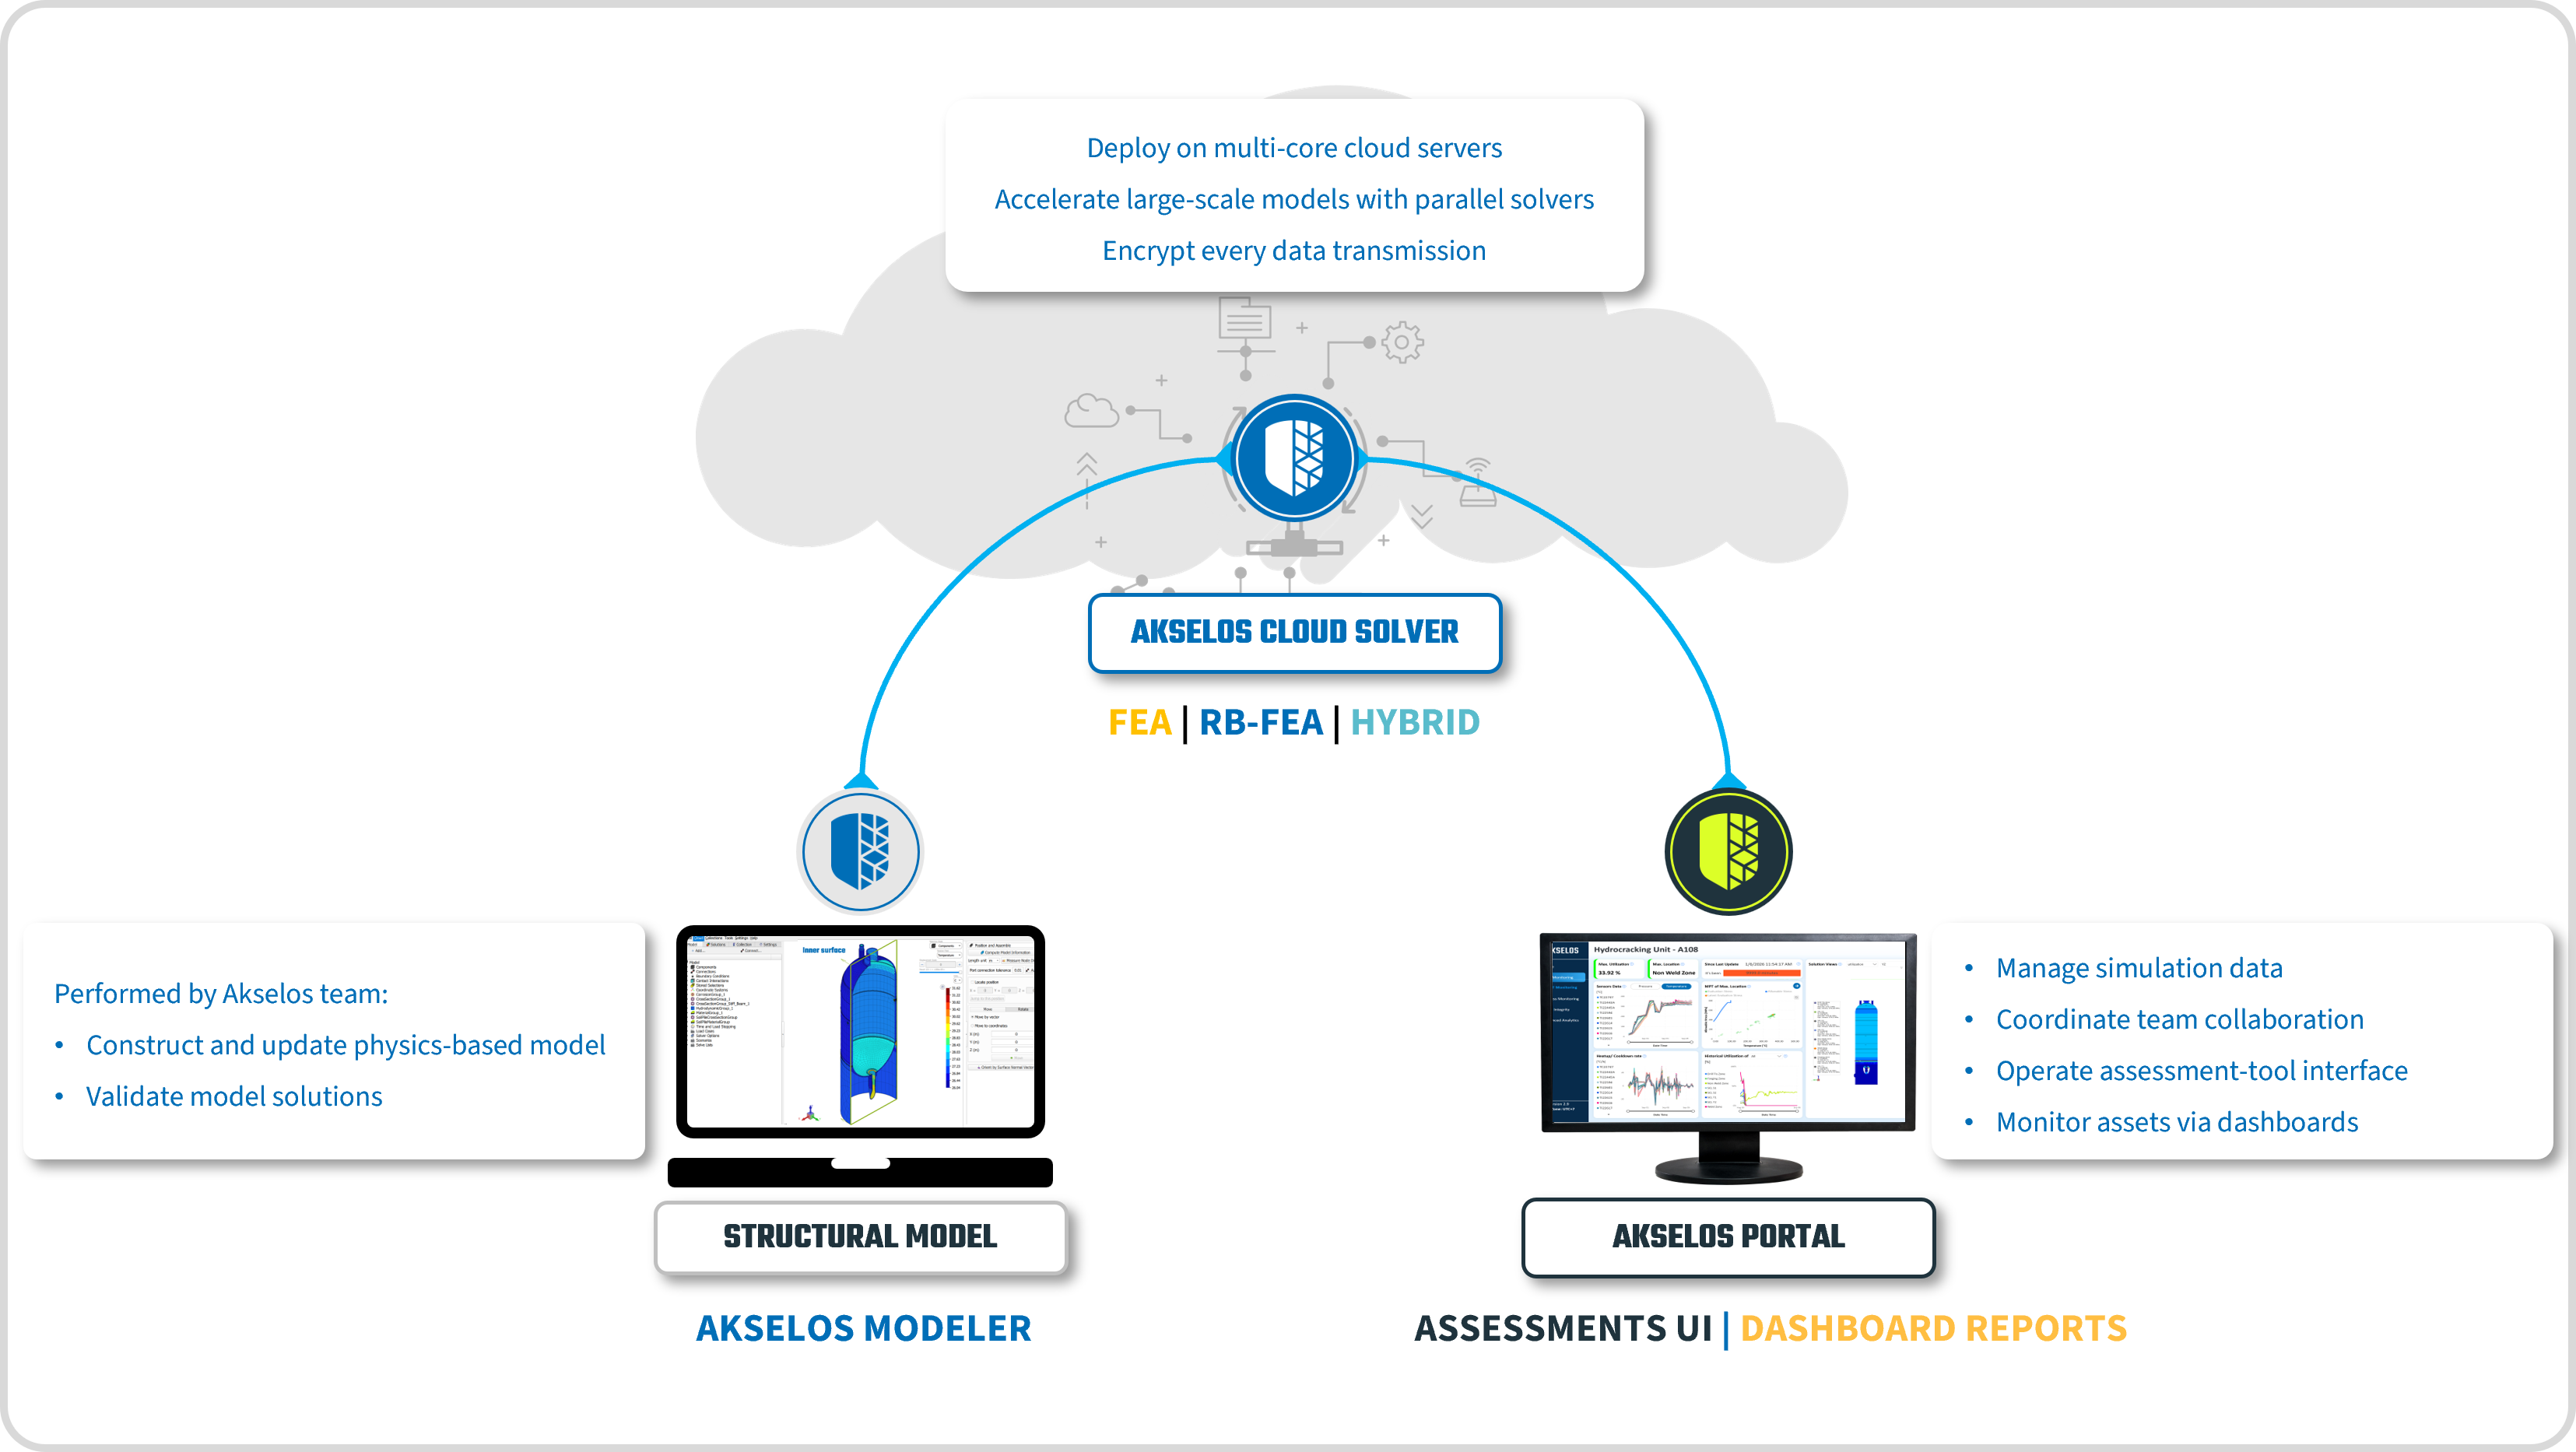
Figure 1 shows where a collection sits among the Akselos tools. The collection is stored on Akselos Cloud and is managed through the Akselos Portal. Akselos Modeler connects to the same cloud to create, modify or add items in the structural twin model, and to analyze and visualize its structural response.
 Akselos Portal]
Figure 1. The structural model in Akselos Modeler, the Akselos Cloud Solver and the Akselos Portal
This article is for engineers who set up structural twin models in an organization on the Akselos Portal. Creating a collection requires the Write or Admin access permission, and importing one requires Akselos Modeler installed on a local computer. For help with any step, contact Akselos Support at [email protected].
Creating a New Collection
Where does a new structural twin model start, and what has to be decided before any data goes into it?
Every structural twin model starts in a collection. The collection holds the model’s files on Akselos Cloud, and its physics type sets which analyses the model can run and which element types it can use. The name and the physics type are the only two inputs on the New Collection form, and both are required. The Akselos Portal offers three physics types, compared in Table 1.
Table 1. Physics types available for a new collection
| Physics type | Analyses | Element types |
|---|---|---|
| Acoustics | Acoustic harmonic analyses | Solid elements only |
| Elasticity | Elasticity eigen and Helmholtz (harmonic) analyses | 1D beam, shell and solid elements, or a combination of them |
| Heat | Steady and transient heat transfer analyses | Solid elements only |
Note: Only an account with the Write or Admin access permission can create a collection.
To create a new collection, follow these steps:
- In the Akselos Portal, open the organization that will hold the collection; its name appears in the left menu, with its sub-tabs beneath it.
- Click Contents in the left menu; the Collections page lists the collections, repositories and folders the organization already holds, with the New Collection button above the list (Figure 2).
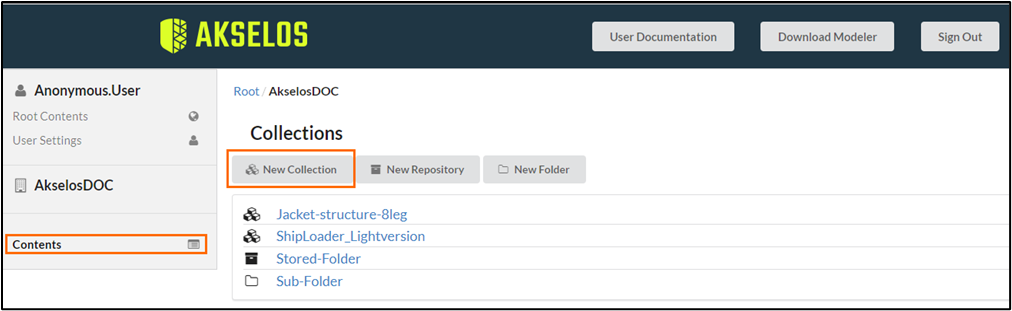
Figure 2. The New Collection button on the Contents page of an organization
- Click New Collection; a form opens with two required fields, each marked with a red asterisk (Figure 3).
- Enter a name in the New Collection name field; the name identifies the collection in the Portal and in the collection list of Akselos Modeler.
- Select a type in the Physics type list; the type sets the analyses and element types the collection supports, as listed in Table 1.
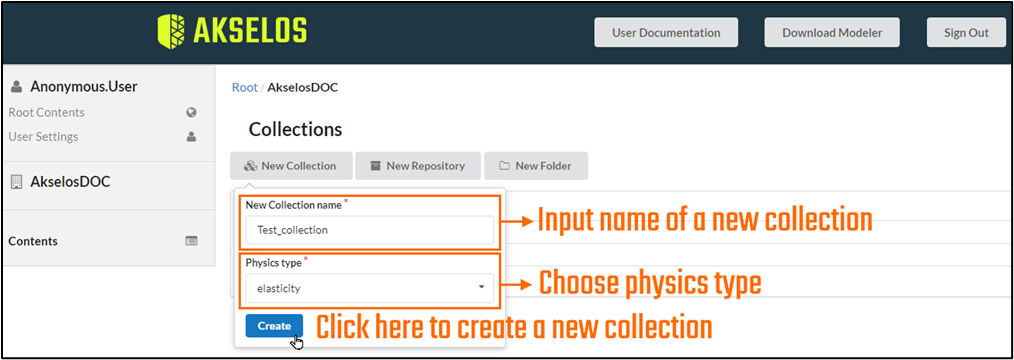
Figure 3. The New Collection name and Physics type fields, and the Create button
- Click Create; the Portal opens the new collection at its own Contents page (Figure 4).
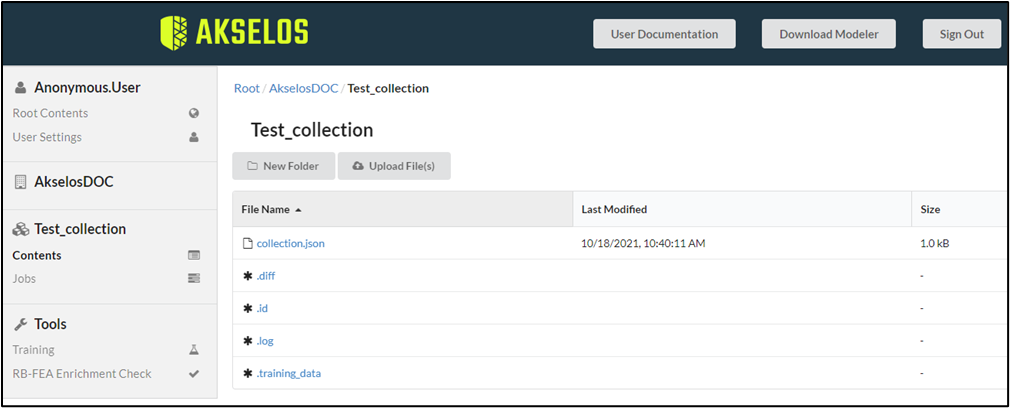
Figure 4. The contents of a newly created collection
A new collection starts with the files collection.json, .diff, .id, .log and .training_data. The left menu now lists the collection with its own Contents and Jobs sub-tabs, and the New Folder and Upload File(s) buttons add further items to it.
The result is the collection where the new structural twin model starts: named, set to one physics type, and ready to hold the model’s data.
Tracking and Troubleshooting Collection Jobs
Did a job run in the collection finish, and if it failed, what went wrong?
The Jobs page of a collection lists every training, solving and post-processing job that any account has run in it. The Current State column gives the outcome of each job, but not the reason for it: a Failure state names no cause, and a job that runs several stages reports one state for all of them.
Three elements of the page close that gap. The job row gives the state, start time, progress, account and tokens consumed. The Subjobs button opens the stages a multi-stage job ran, each with its own state. The Details button opens the job’s log files, where the .err and .out files describe a failure. Two controls in the Action column keep the list manageable: Stop cancels a running job, and Archive removes a finished job from the list.
To find out whether a job finished and why it failed, follow these steps:
- Open the collection in the Akselos Portal and click Jobs in the left menu, under the collection name; the Jobs page lists each job by its Description and Current State (Figure 5).
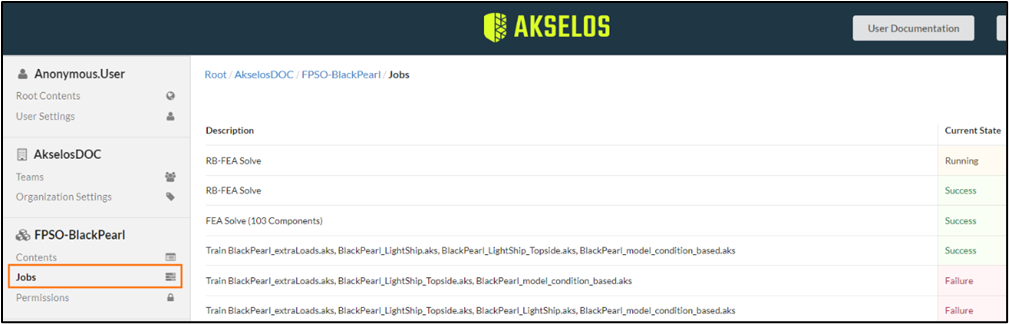
Figure 5. The Jobs page of a collection, listing its training and solve jobs
- Read the job’s row; the Current State, Start Time, Elapsed / Progress, User and Tokens Consumed columns show the outcome so far, when the job started, how far it has run, which account ran it, and the tokens it has used.
- To cancel a job that is not running as expected, click Stop in its Action column; the job is canceled (Figure 6).

Figure 6. The Stop button on a running job
- To clear a finished job from the list, click Archive in its Action column; the job leaves the list and can still be retrieved later if it is needed (Figure 7).

Figure 7. The Archive button on a finished job
- Check the buttons in the job’s row; a job that ran several sub-jobs carries a Subjobs button next to Details, and a single-stage job carries Details only (Figure 8).

Figure 8. A job with the Details button only, and a job with both Details and Subjobs
- Click Subjobs; a panel lists each sub-job with its own state, start time and progress, and a sub-job that ran further stages carries its own Subjobs button (Figure 9).
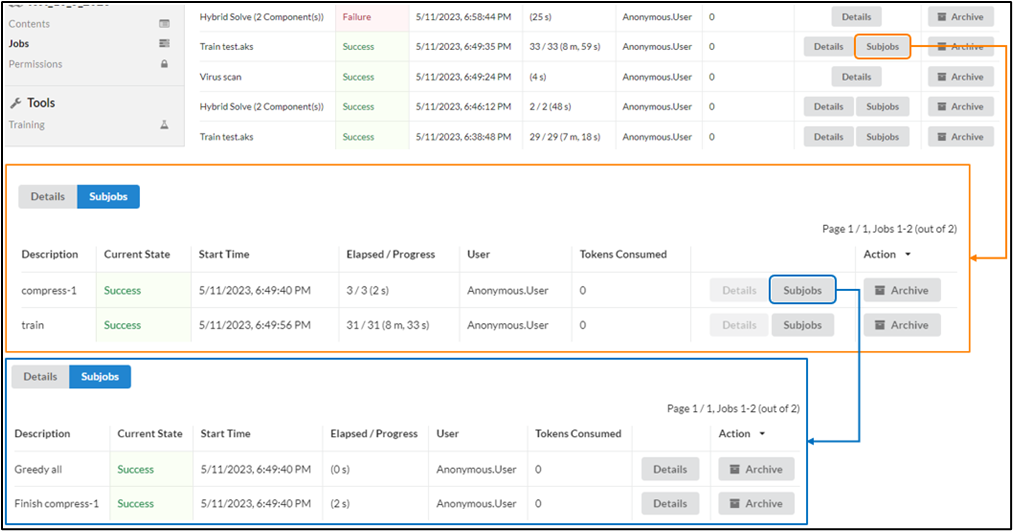
Figure 9. Sub-jobs of a training job, opened two levels deep with the Subjobs button
- Click Details; the Available log files list opens with the job’s log files and the time each was last modified (Figure 10).
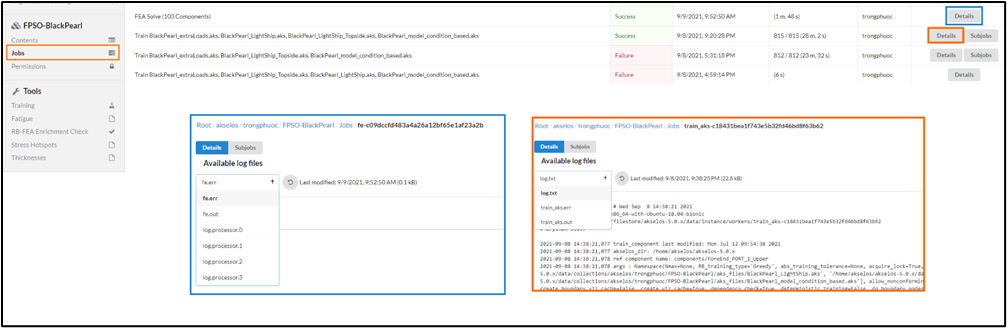
Figure 10. The Available log files list opened with the Details button
- For a job in the Failure state, select its .err file, then its .out file, in the Available log files list; the file content describes the problem that stopped the job (Figure 11).
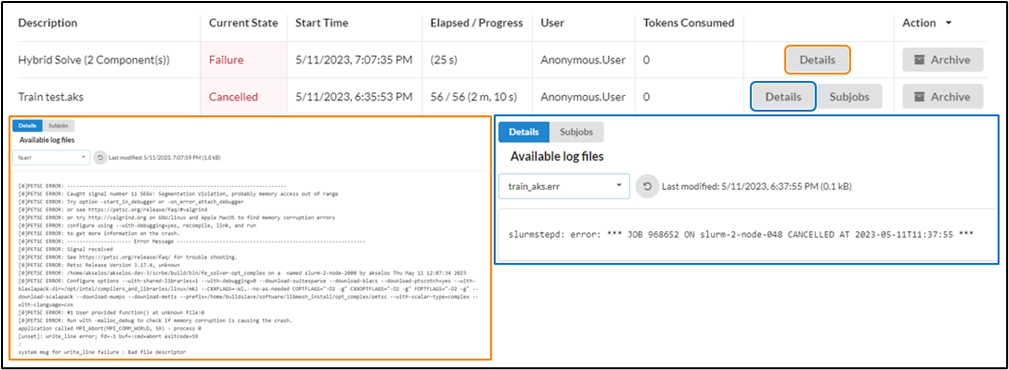
Figure 11. Log file content for a failed job and for a canceled job
Where the log text does not make the cause of a failure clear, Akselos Support can help at [email protected].
The result is the state of the job and, for a failed job, the log text that explains what went wrong.
Importing a Collection into Akselos Modeler
How does a collection created in the Portal reach a local computer, so that its model can be built, solved and customized?
A collection created in the Akselos Portal is stored on Akselos Cloud only. Solving and customizing the structural twin model take place in Akselos Modeler on a local computer, so the collection is imported there first. Two dialogs in Akselos Modeler make the import work. The Authentication dialog confirms that Akselos Modeler is connected to the server, and the Import Collection dialog lists the collections by organization, so the right one can be selected. The Logs tab then confirms that the import succeeded.
To import a collection into Akselos Modeler, follow these steps:
- In Akselos Modeler, open the Cloud menu and select Authentication; the Authentication dialog opens (Figure 12).
- Enter the account name in Username and the password in Password or Token, then click Check; the Authentication Status dot turns green when Akselos Modeler is connected to the server.
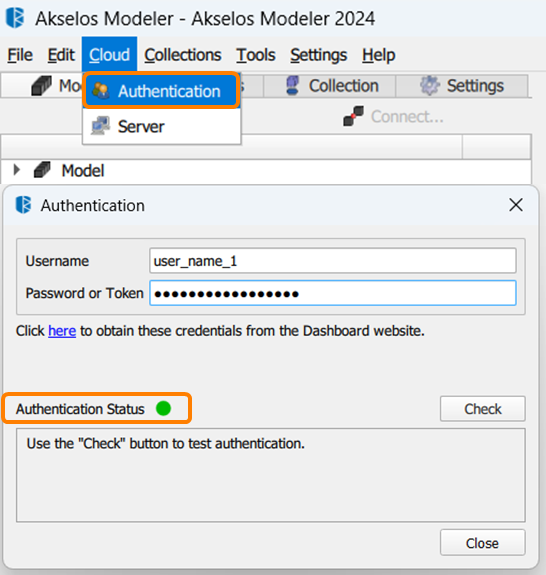
Figure 12. The Authentication dialog, with a green Authentication Status dot
- Open the Collections menu and select Import Collection...; the Import Collection dialog lists the available collections by organization, with a Filter field to narrow the list.
- Select the collection, then click the Import button at the bottom of the dialog; the button names the selected collection, so the choice can be confirmed before the import starts (Figure 13).
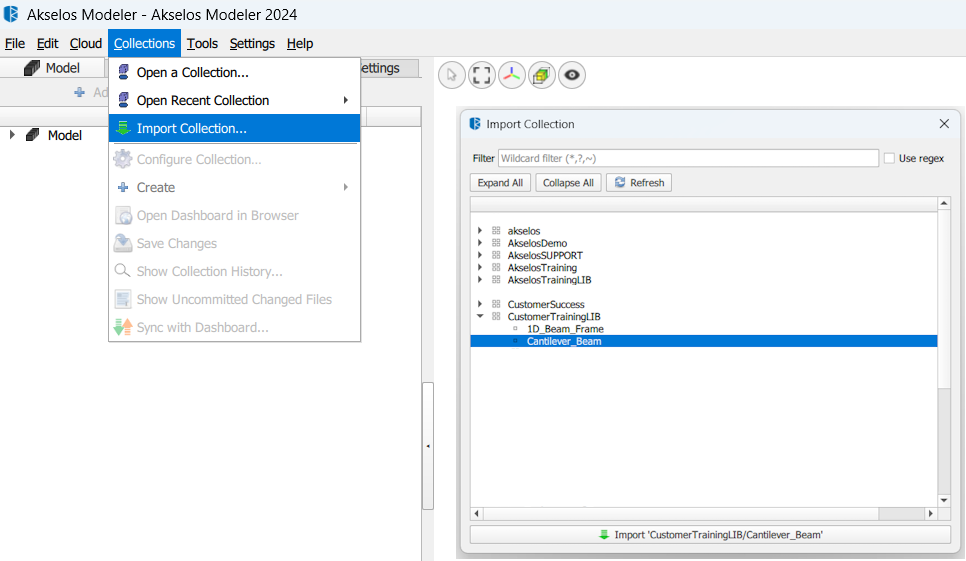
Figure 13. The Import Collection dialog with a collection selected
- Follow the progress in the dialog that opens; it lists each file as it is copied and ends with the message Successfully cloned new collection.
- Click Close; the Logs tab at the bottom of the window shows a message confirming that the collection was imported (Figure 14).
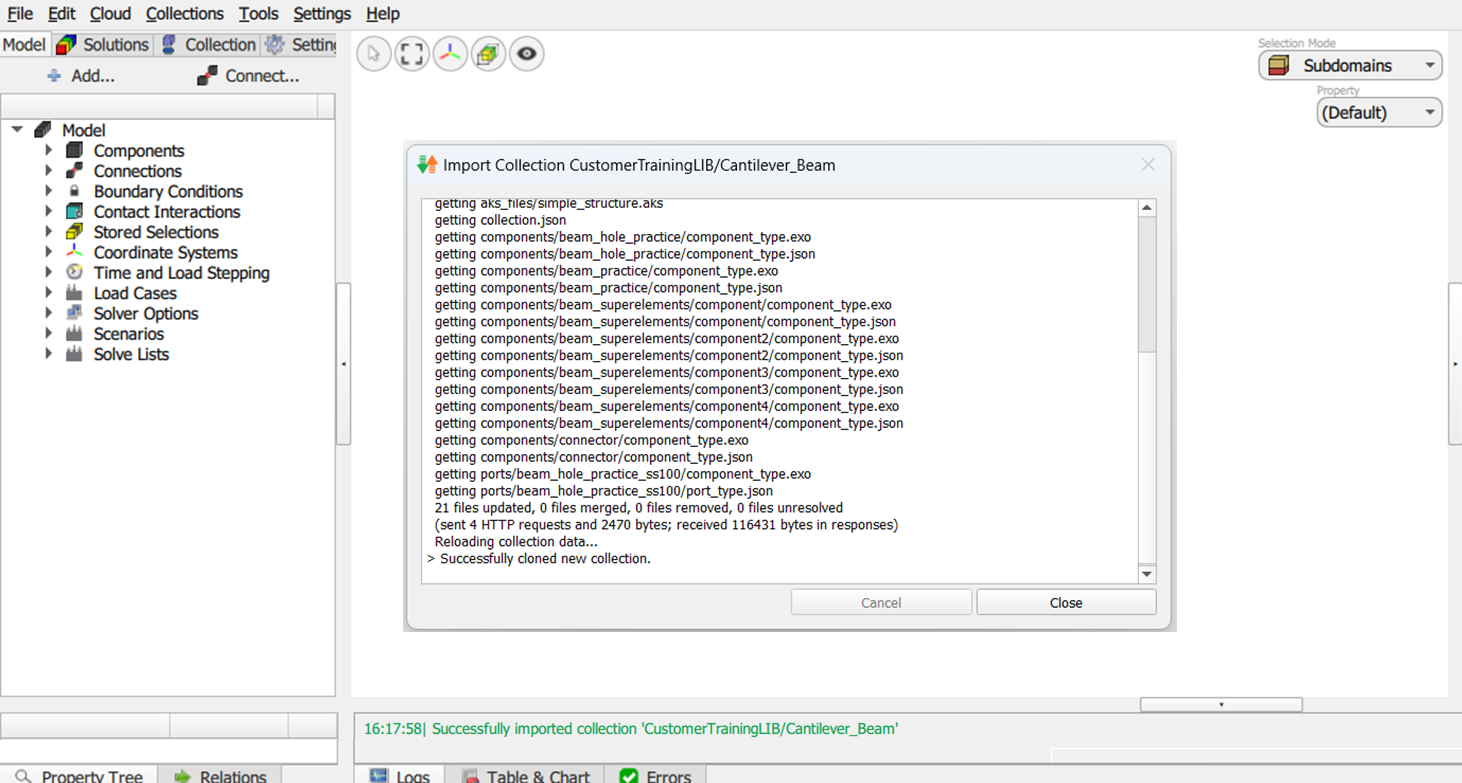
Figure 14. Import progress and the confirmation message in the Logs tab
The result is the collection on the local computer, imported into Akselos Modeler and ready for the model to be built, solved and customized.